Install & setup Kubernetes cluster from scratch on Ubuntu
Preparing the Environment
Before setting up a Kubernetes cluster, make sure your environment is prepared. This includes having a minimum of two servers running a Linux operating system, with a minimum of 2GB of RAM and 2 CPU cores each. You should also have a basic understanding of containerization, Docker, and networking concepts.
Setup Prerequisites
- Minimum two Ubuntu nodes [One master and one worker node]. You can have more worker nodes as per your requirement.
- The master node should have a minimum of 2 vCPU and 2GB RAM.
- For the worker nodes, a minimum of 1vCPU and 2 GB RAM is recommended.
- 10.X.X.X/X network range with static IPs for master and worker nodes. We will be using the 192.x.x.x series as the pod network range that will be used by the Calico network plugin. Make sure the Node IP range and pod IP range don’t overlap.
System Configuration
On all nodes, perform the following steps:
## make sure the swap is disabled
swapoff -a

cat <<EOF | sudo tee /etc/modules-load.d/k8s.conf
overlay
br_netfilter
ip_vs
ip_vs_lc
ip_vs_wlc
ip_vs_rr
ip_vs_wrr
ip_vs_lblc
ip_vs_lblcr
ip_vs_dh
ip_vs_sh
ip_vs_fo
ip_vs_nq
ip_vs_sed
ip_vs_ftp
ip_vs_sh
nf_conntrack_ipv4
ip_tables
ip_set
xt_set
ipt_set
ipt_rpfilter
ipt_REJECT
ipip
EOF

sudo modprobe overlay
sudo modprobe br_netfilter

# sysctl params required by setup, params persist across reboots
cat <<EOF | sudo tee /etc/sysctl.d/k8s.conf
net.ipv4.ip_forward = 1
net.bridge.bridge-nf-call-iptables = 1
net.bridge.bridge-nf-call-ip6tables = 1
fs.may_detach_mounts = 1
net.ipv4.conf.all.route_localnet = 1
vm.overcommit_memory=1
vm.panic_on_oom=0
fs.inotify.max_user_watches=89100
fs.file-max=52706963
fs.nr_open=52706963
net.netfilter.nf_conntrack_max=2310720

net.ipv4.tcp_keepalive_time = 600
net.ipv4.tcp_keepalive_probes = 3
net.ipv4.tcp_keepalive_intvl =15
net.ipv4.tcp_max_tw_buckets = 36000
net.ipv4.tcp_tw_reuse = 1
net.ipv4.tcp_max_orphans = 327680
net.ipv4.tcp_orphan_retries = 3
net.ipv4.tcp_syncookies = 1
net.ipv4.tcp_max_syn_backlog = 16384
net.ipv4.ip_conntrack_max = 65536
net.ipv4.tcp_max_syn_backlog = 16384
net.ipv4.tcp_timestamps = 0
net.core.somaxconn = 16384
EOF

# Apply sysctl params without reboot
sudo sysctl --system
Install CRI-O Runtime On All Nodes
You can choose any container runtime for Kubernetes. Here we use docker as the container runtime. You can also use CRI-O, containerd, or any other container runtime.
- CRI-O:
https://cri-o.io/ - containerd:
https://containerd.io/ - Docker Engine:
https://www.docker.com
curl -fsSL https://download.docker.com/linux/ubuntu/gpg | sudo apt-key add -
add-apt-repository "deb [arch=amd64] https://download.docker.com/linux/ubuntu $(lsb_release -cs) stable"
sudo apt-get update
sudo apt-get install docker-ce docker-ce-cli containerd.io docker-buildx-plugin docker-compose-plugin
Master Node Setup
Install kubelet kubeadm kubectl
sudo apt-get update && sudo apt-get install -y apt-transport-https curl
curl -s <https://packages.cloud.google.com/apt/doc/apt-key.gpg> | apt-key add -
cat <<EOF >/etc/apt/sources.list.d/kubernetes.list
deb <https://apt.kubernetes.io/> kubernetes-xenial main
EOF
sudo apt-get install -y kubelet kubeadm kubectl
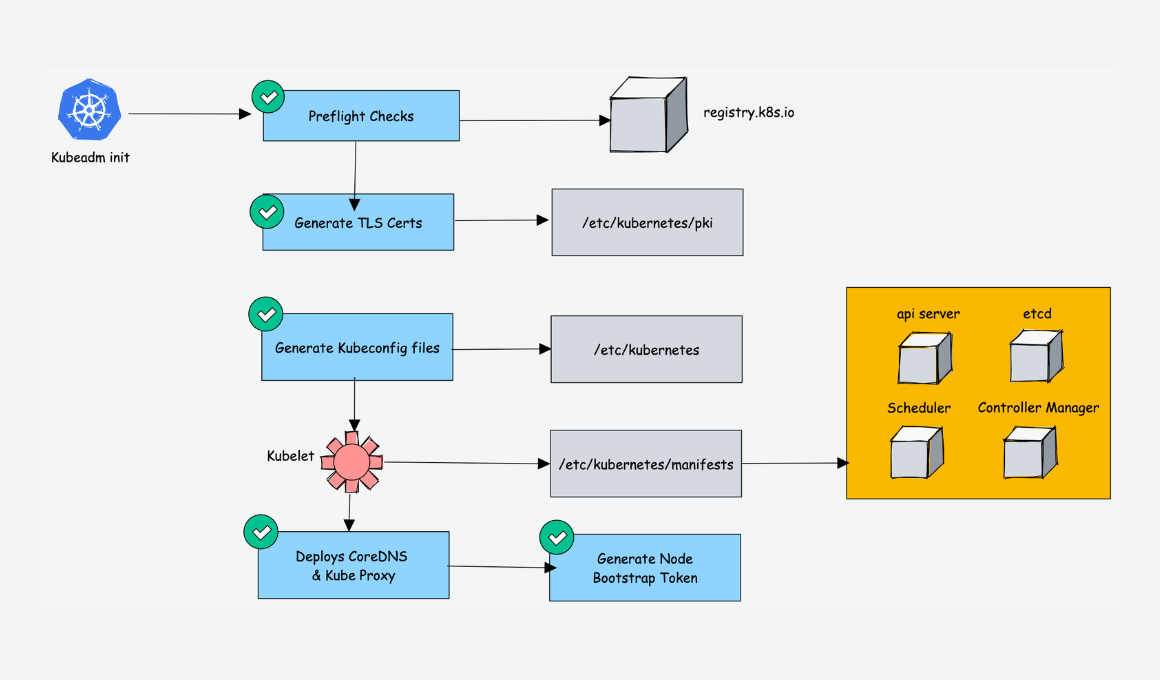
Initialize Kubernetes Cluster
## master 1
kubeadm init --kubernetes-version=1.20.0 --apiserver-advertise-address=192.168.1.3 --control-plane-endpoint=192.168.1.7:8443 --image-repository registry.aliyuncs.com/google_containers --service-cidr=10.10.0.0/16  --pod-network-cidr=10.122.0.0/16 --upload-certs

## master 2
kubeadm join 192.168.1.7:8443 --token 87z2c8.rxtz78pfculvq5il --discovery-token-ca-cert-hash sha256:5682f51b25e076b75c7c02139435fed3ebe03b28ae3752599ea3ae6129830969    --control-plane --certificate-key d87854ac7al80dd5c9720336f6700d76c2e7e998317f7b7e4650d6e90758beff

## master 3
kubeadm join 192.168.1.7:8443 --token 87z2c8.rxtz78pfculvq5il --discovery-token-ca-cert-hash sha256:5682f51b25e076b75c7c02139435fed3ebe03b28ae3752599ea3ae6129830969 --control-plane --certificate-key d87854ac7a180dd5c9720336f6700d76c2e7e998317f7b7e4650d6e90758beff
Initialize Calico Network Plugin
kubectl apply -f https://raw.githubusercontent.com/projectcalico/calico/v3.25.0/manifests/calico.yaml
Worker Node Setup
Install kubectl kubelet kubeadm
sudo apt-get install -y kubelet kubeadm kubectl kubernetes-cni
Join Worker Nodes to the Cluster
kubeadm token create --print-join-command

kubeadm join 192.168.1.7:8443 --token 87z2c8.rxtz78pfculvq5il --discovery-token-ca-cert-hash sha256:5682f51b25e076b75c7c02139435fed3ebe03b28ae3752599ea3ae6129830969
Confirm the Cluster Status
kubectl get nodes
kubectl cluster-info
kubectl get po -n kube-system
Setup Kubernetes Metrics Server
kubectl apply -f https://raw.githubusercontent.com/techiescamp/kubeadm-scripts/main/manifests/metrics-server.yaml
kubectl top nodes
Deploy A Sample Nginx Application
cat <<EOF | kubectl apply -f -
apiVersion: apps/v1
kind: Deployment
metadata:
  name: nginx-deployment
spec:
  selector:
    matchLabels:
      app: nginx
  replicas: 2
  template:
    metadata:
      labels:
        app: nginx
    spec:
      containers:
      - name: nginx
        image: nginx:latest
        ports:
        - containerPort: 80
EOF
Expose the Nginx deployment on a NodePort 32000
cat <<EOF | kubectl apply -f -
apiVersion: v1
kind: Service
metadata:
  name: nginx-service
spec:
  selector:
    app: nginx
  type: NodePort
  ports:
    - port: 80
      targetPort: 80
      nodePort: 32000
EOF
References
https://devopscube.com/setup-kubernetes-cluster-kubeadm/- Kubernetes for Jobseekers - DevOps and Kubernetes interview questions andanswers for freshers and experienced professionals, Shivakumar Gopalakrishnan
Kubernetes零基础快速入门