Redis - Basics and summary
Introduction
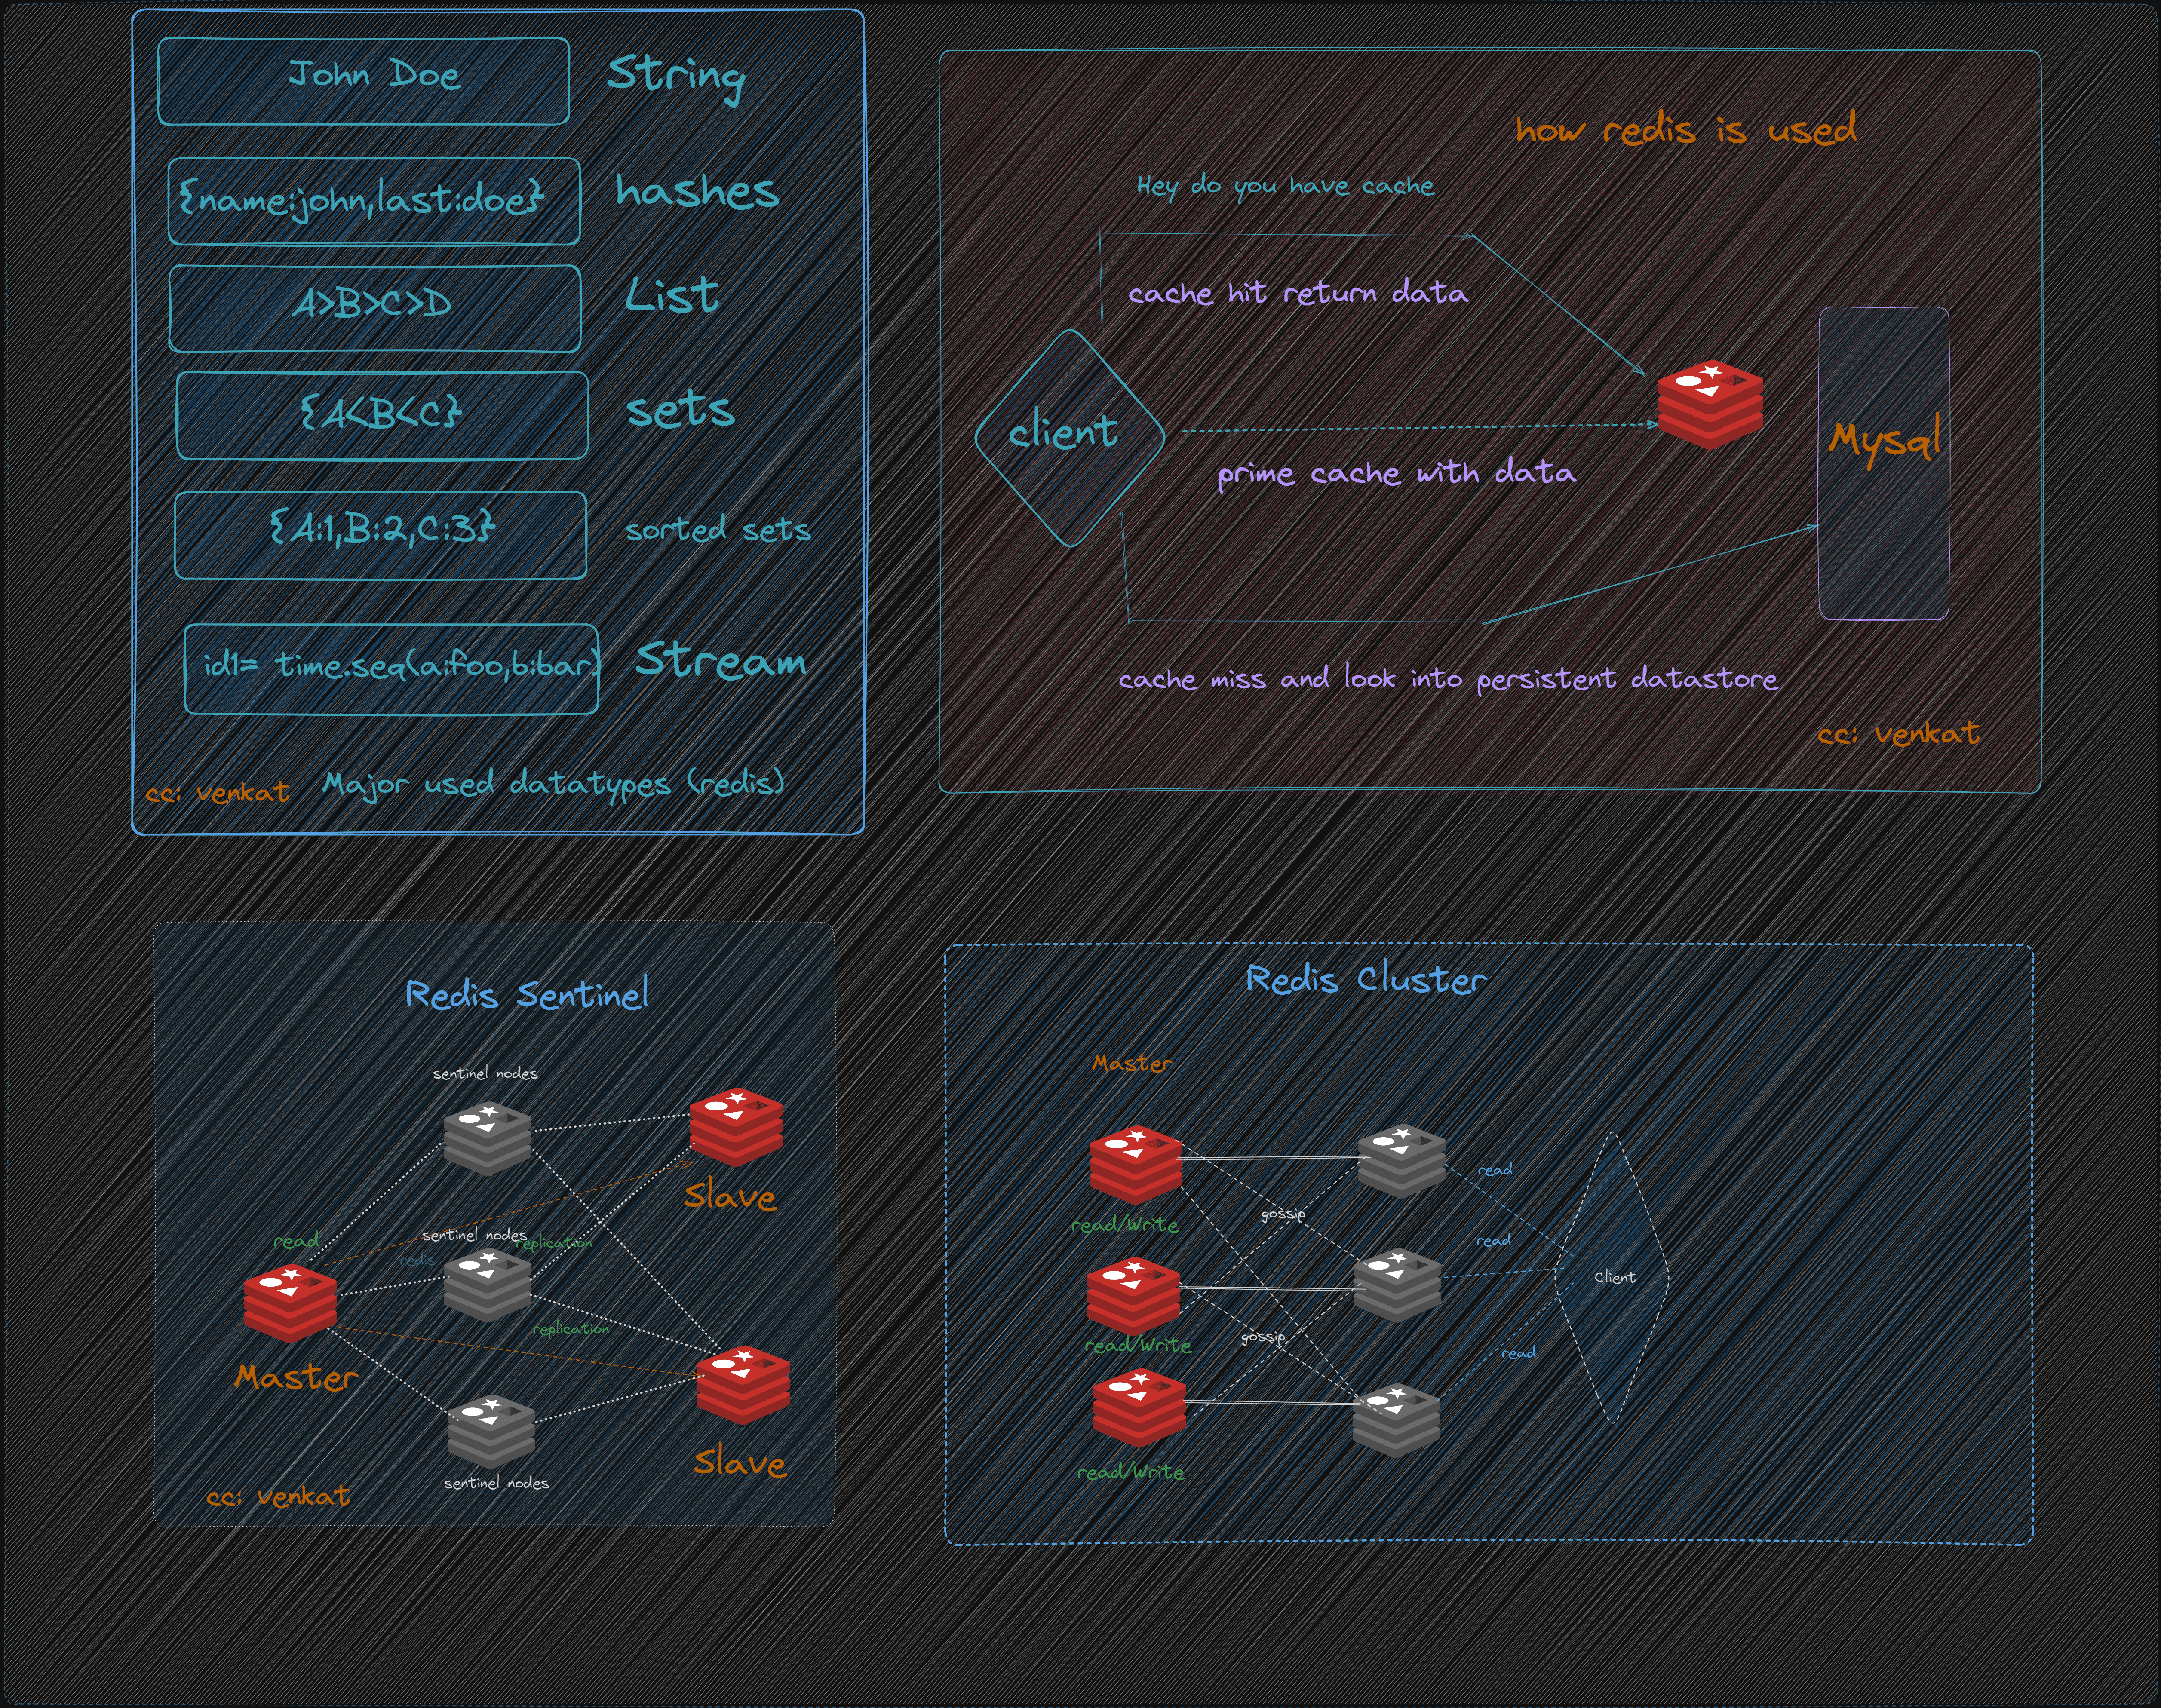
Redis is an open-source, in-memory data structure store that is commonly used as a database, cache, and message broker. It is known for its high performance, scalability, and flexibility. Redis supports a wide range of data structures, including strings, hashes, sets, sorted sets, and lists, and provides a variety of operations for each data structure.
Redis is often used in web applications to cache frequently accessed data, improve performance, and reduce database load. It is also used as a message broker in real-time systems and as a database for storing session data.
This document aims to provide a simple introduction to Redis for those who are new to it. It covers various aspects of Redis, such as data types, implementation details, best practices, and operations, to help you get started with Redis and make the most of its features.
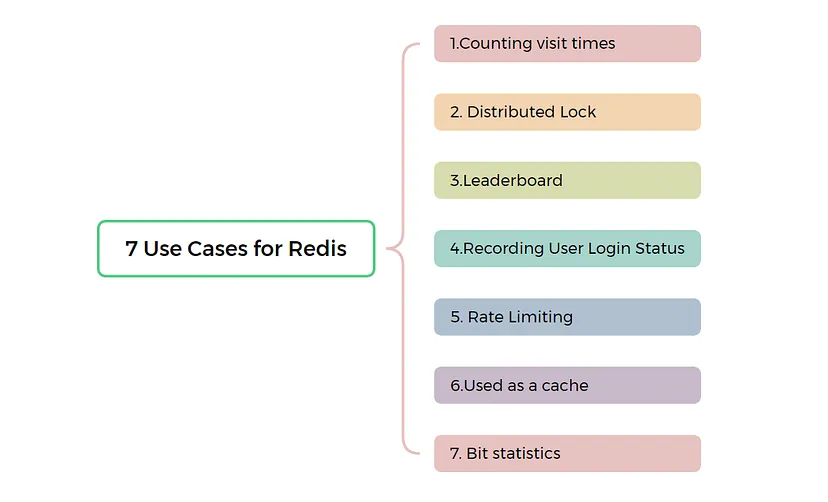
Redis User Cases
Commands and Configuration
Common Command Query
- Redis Command Reference (
https://redis.io/commands)
Master-Slave Configuration
slaveof 10.4.44.71 3904
slaveof no one
# Set the read-only / writable of the slave
config set slave-read-only yes
config set slave-read-only no
Memory Recycling Policy
config get maxmemory-policy
When the maxmemory limit is reached, Redis will take precise action as configured by the maxmemory-policy configuration command. The following policies are available:
noeviction: Returns an error when the memory limit is reached. Attempting to execute commands by the client will cause more memory usage (most write commands, exceptDELand some exceptions). If the data is very sensitive and data loss is not allowed, it is recommended to use thenoevictionpolicy.allkeys-lru: Recycles the least recently used (LRU) keys to make room for new data. If you have hot and cold data, it is recommended to use theallkeys-lrustrategy.volatile-lru: Recycles the least recently used (LRU) keys, but only recycles keys with expiration set to make room for new data.allkeys-random: Recycles random keys to make room for new data. If you need to read and write all keys in a loop, or the access frequency of each key is similar, you can use theallkeys-randomstrategy, where the probability of reading and writing all elements is similar.volatile-random: Recycles random keys, but only recycles keys with expiration set to make room for new data.volatile-ttl: Recycles keys with expiration set and tries to recycle the key with the shortest time to live (TTL) to make room for new data.
Replication
Adjusting the replication timeout
config get repl-timeout
config set repl-timeout 1800
Adjusting the replication buffer size
The last two parameters after slave represent the hard limit and soft limit, respectively. The hard limit cannot be exceeded and any attempts to write beyond it will fail. The soft limit indicates that the limit has been continuously reached for 60 seconds.
config set client-output-buffer-limit "slave 2684354560 536870912 0"
Setting the size of the replication backlog buffer
config get repl-backlog-size
config set repl-backlog-size xx
(unit: bytes)
Persistence
Set the rewrite size to 80GB
config set auto-aof-rewrite-percentage 200
config set auto-aof-rewrite-min-size 80108864000
Replay commands through AOF
tail -n +6 /opt/redis_dump/appendonly.aof | pv -L 10m | nc 10.13.56.15 3707 > ~/run.log
Turn off AOF
config set appendonly no
When AOF full
When the aof file fills up the disk, its write operation fails and there is no other space on the disk to be released. In such cases, you need to clear the aof file and then execute bgrewrite. After clearing the aof file, use the following command to clear the file handle:
>appendonly.aof
If the aof file is deleted directly, the disk space will not be released because the file handle is not released. In this case, use the following command to clear the deleted file.
>/proc/${pid}/fd
Cluster
View the cluster nodes topology distribution
redis-cli -h 10.3.23.27 -p 3920 cluster nodes
Adding a new node to an existing cluster
To add a new node to an existing cluster, select any node from the current cluster (10.3.23.35:3920) and then add the new node (10.3.20.213:3920).
redis-cli -h 10.3.23.35 -p 3920 CLUSTER MEET 10.3.20.213 3920
Setting up slave nodes
To set 10.3.20.213 3920 as a slave node for node-id (fd276dc8e818f53239f988dc2bb3ec85504f9096), follow these steps:
redis-cli -h 10.3.20.213 -p 3920
 CLUSTER REPLICATE fd276dc8e818f53239f988dc2bb3ec85504f9096
Resetting a Node in the Cluster
To reset a node in the cluster, first remove it from the cluster topology, then clear and reset its data, and finally add it back to the cluster. For example, if the node to be reset is 10.3.20.213:3920 and its node-id is fd276dc8e818f53239f988dc2bb3ec85504f9096, follow these steps:
- Remove the node from the cluster topology.
- Clear and reset the node data.
- Add the node back to the cluster.
# Send forget command to all nodes in the cluster for the node
redis-cli -h 10.3.1.1 -p 3920
 CLUSTER FORGET fd276dc8e818f53239f988dc2bb3ec85504f9096
# Connect to the node, clear the data and reset it
redis-cli -h 10.3.20.213 -p 3920
  FLUSHALL
  CLUSTER RESET
# Connect to any node and add the new node
redis-cli -h 10.3.1.1 -p 3920 CLUSTER MEET 10.3.20.213 3920
View the number of keys in the specified slot in the cluster
redis-cli -h 10.3.23.35 -p 3920 CLUSTER COUNTKEYSINSLOT 11587
Set the slot to a specific node
redis-cli -h 10.3.21.50 -p 3920 CLUSTER SETSLOT 11587 NODE f68aa3484f2340a9586632b2696f5a8fe0b30f40
Set the timeout for the cluster
The default is 5s.
config set cluster-node-timeout 30000
cluster rebalance
redis-cli --cluster rebalance ip:port

  rebalance      host:port
                 --cluster-weight <node1=w1...nodeN=wN>
                 --cluster-use-empty-masters
                 --cluster-timeout <arg>
                 --cluster-simulate
                 --cluster-pipeline <arg>
                 --cluster-threshold <arg>
                 --cluster-replace
cluster failover
If both the master and the slave are active, switch the slave to become the master.
slave-node-cli> CLUSTER FAILOVER
If the master server goes down, switch the slave server to become the master.
slave-node-cli> CLUSTER FAILOVER [FORCE|TAKEOVER]
- The
FORCEoption does not handshake with the master. Instead, it broadcasts information, communicates with other masters in the cluster, and obtains authorized votes to become the new master. - The
TAKEOVERoption does not handshake with the master and does not need to get other master votes. It is directly promoted to the master when a large number of slaves are set as the master during data center switching, or when most of the masters are not available due to a brain split.
Note: TAKEOVER violates the last-failover-wins principle of Redis Cluster. Refer to
https://redis.io/commands/cluster-failoverfor more information.
Slot Migration Process
I. Set the destination node to the “importing state” using the following command:
CLUSTER SETSLOT <slot> IMPORTING <source-node-id>.
- Directly request the
keyof thisslotand returnMOVEDredirection. - First, send the
ASKINGcommand, then request thekeyof thisslot, and process the request.
II. Set the source node to the “migrating state” using the following command:
CLUSTER SETSLOT <slot> MIGRATING <destination-node-id>.
- Requests for existing
keysare treated the same as the original processing logic. - If the request does not include a
key, theclientreturns anaskredirection, and theclientrequests theimportingnode. - If the request contains multiple
keys, some exist and some do not,TRYAGAINis returned until allkeysare migrated.
III. Read the key from the source node in a loop and transfer them to the destination node using this command:
CLUSTER GETKEYSINSLOT
MIGRATE host port key "" destination-db timeout REPLACE KEYS key [key ...]
IV. Set the slots status to normal using the following command:
 CLUSTER SETSLOT <slot> NODE <destination-node-id>
 # in the source and destination
The CLUSTER SETSLOT <slot> NODE <node-id> command is typically used to send a command to the two instances in the migration status after the migration slot is completed.
Effects:
- Executing this command on the owner of the
slotwill result in an error. - Executing this command on the instance in the
migratingstate of theslotwill clear themigratingstate. - Executing this command on the instance in the
importingstate of theslotwill clear theimportingstate, and check theepoch id. If theepoch idis not the largest in the cluster, a new maximumidwill be generated (note that this does not communicate with the cluster, so you will need to manually reset it to the maximum).
Note: If the migration process is interrupted and the status is modified, execute the following command on the node to be repaired.
redis-cli -h <host> -p <port> cluster setslot <slot> stable
Note: just clear migrating / importing state
https://redis.io/commands/cluster-setslot
client tools
View the list of clients currently connected to the server
127.0.0.1:6379> client list
addr=127.0.0.1:52555 fd=5 name= age=855 idle=0 flags=N db=0 sub=0 psub=0 multi=-1 qbuf=0 qbuf-free=32768 obl=0 oll=0 omem=0 events=r cmd=client
addr=127.0.0.1:52787 fd=6 name= age=6 idle=5 flags=N db=0 sub=0 psub=0 multi=-1 qbuf=0 qbuf-free=0 obl=0 oll=0 omem=0 events=r cmd=ping
Each line represents various information of a connection:
addr: TheTCPaddress of the client, including theIPand port.fd: The file descriptor handle number corresponding to the client connection socket.name: The name of the connection, which is empty by default and can be set throughCLIENT SETNAME.age: The number of seconds the client has been alive.idle: The number of seconds the client has been idle.
View the currently executing command
monitor
Big Keys
Large keys not only reduce the throughput of the proxy, but also easily trigger blocking, and the response time of long-tail requests will increase. It is best to compress them before storing.
View
slowlog get {N}
memory usage KEY
debug object key
## Serializedlength does not represent the actual byte size. It returns the length of the object serialized using RDB encoding, which may be smaller. However, it has some auxiliary effects for troubleshooting bigkey.
redis-cli --stat
redis-cli -h {ip} -p {port} bigkeys
redis-cli -h {ip} -p {port} --latency
Not Recommended
- The size of
stringtype should not exceed 10KB. - The number of elements in
HASH,SET,ZSET, andLISTshould not exceed 1000. - It is not recommended to use
hgetall,lrange,mget, ormsetto obtain thousands of elements at once. - When the element or number of elements is too large, it is not recommended to query all elements. For example, the
zrange key 0 -1command will result in slow queries. - It is not recommended to have more than 500
keys underpipeline. It is best to keep it within 100.
Recommended
- It is recommended to keep the size of
stringtype within 1k. Forjsonstrings larger than 10k, it is recommended to store them using compression. - It is recommended to distribute the expiration time to prevent expiration blocking due to concentration of data.
Redishas a compression algorithm for data with fewer elements and smaller values, which can reduce the data structure overhead ofRedisitself.
| Type | Maximum number of elements |
|---|---|
| Hash | 512 |
| Set | 512 |
| Zset | 128 |
| List | 512 |
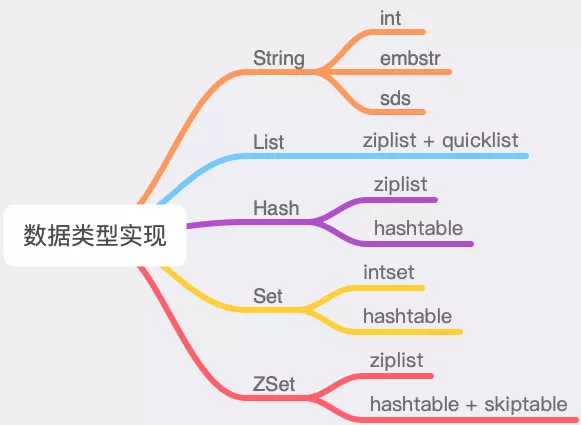
Data Types and Implementation
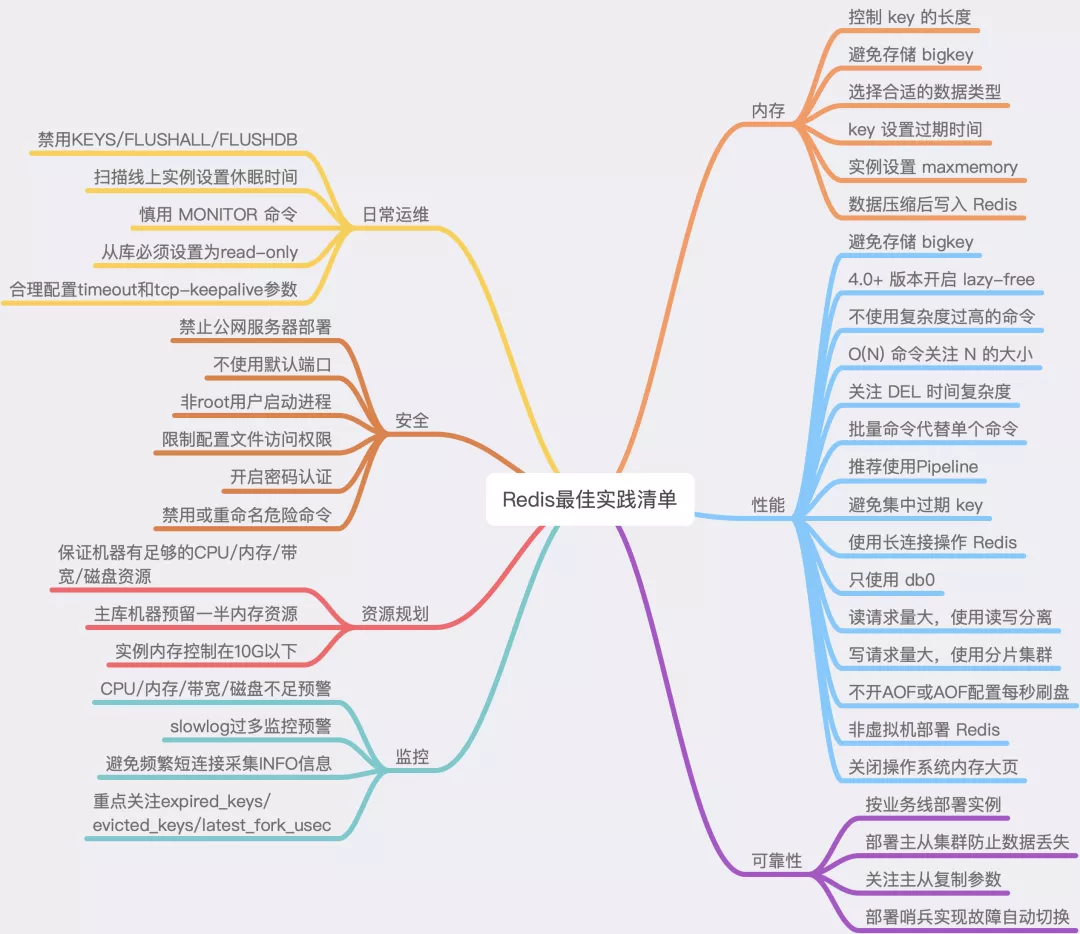
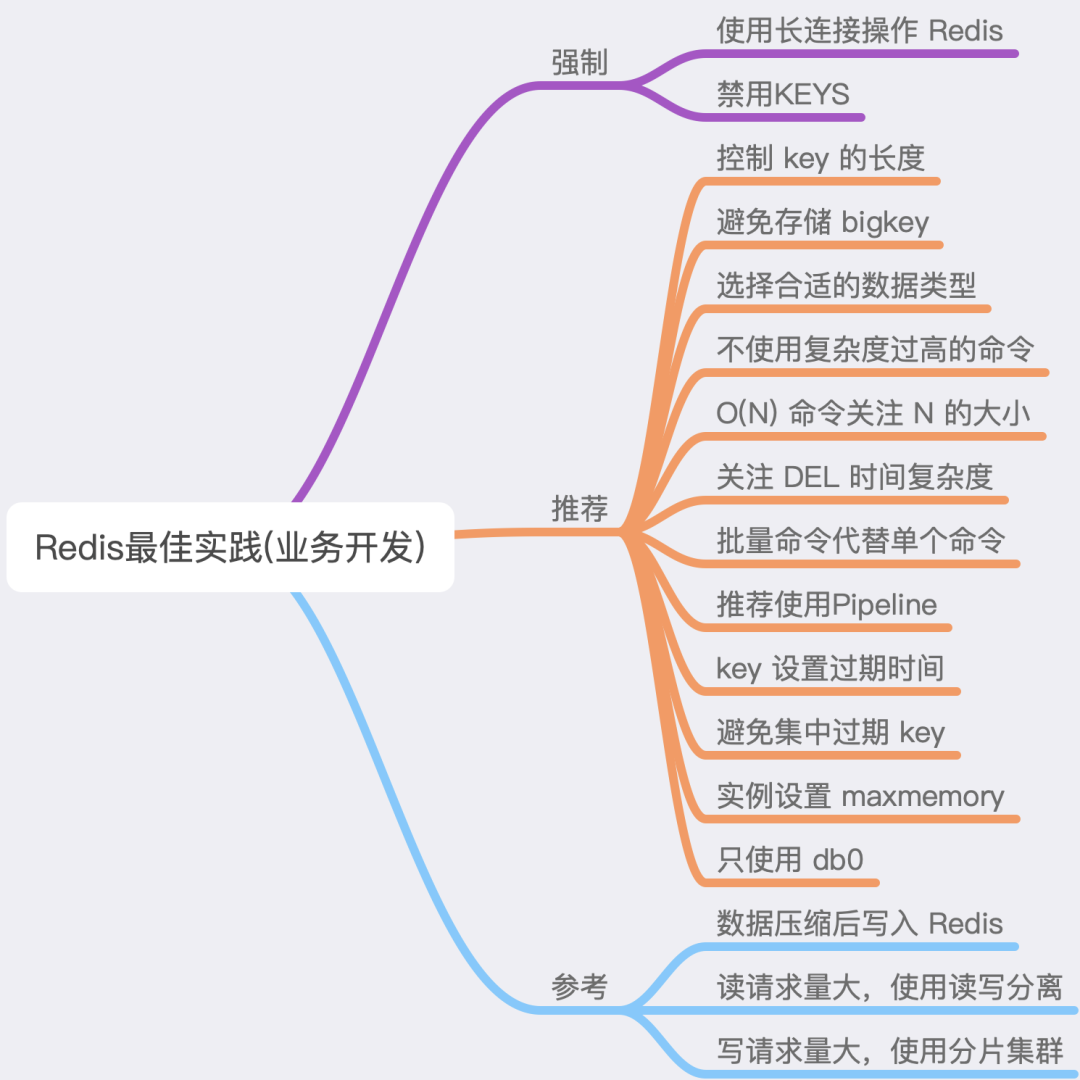
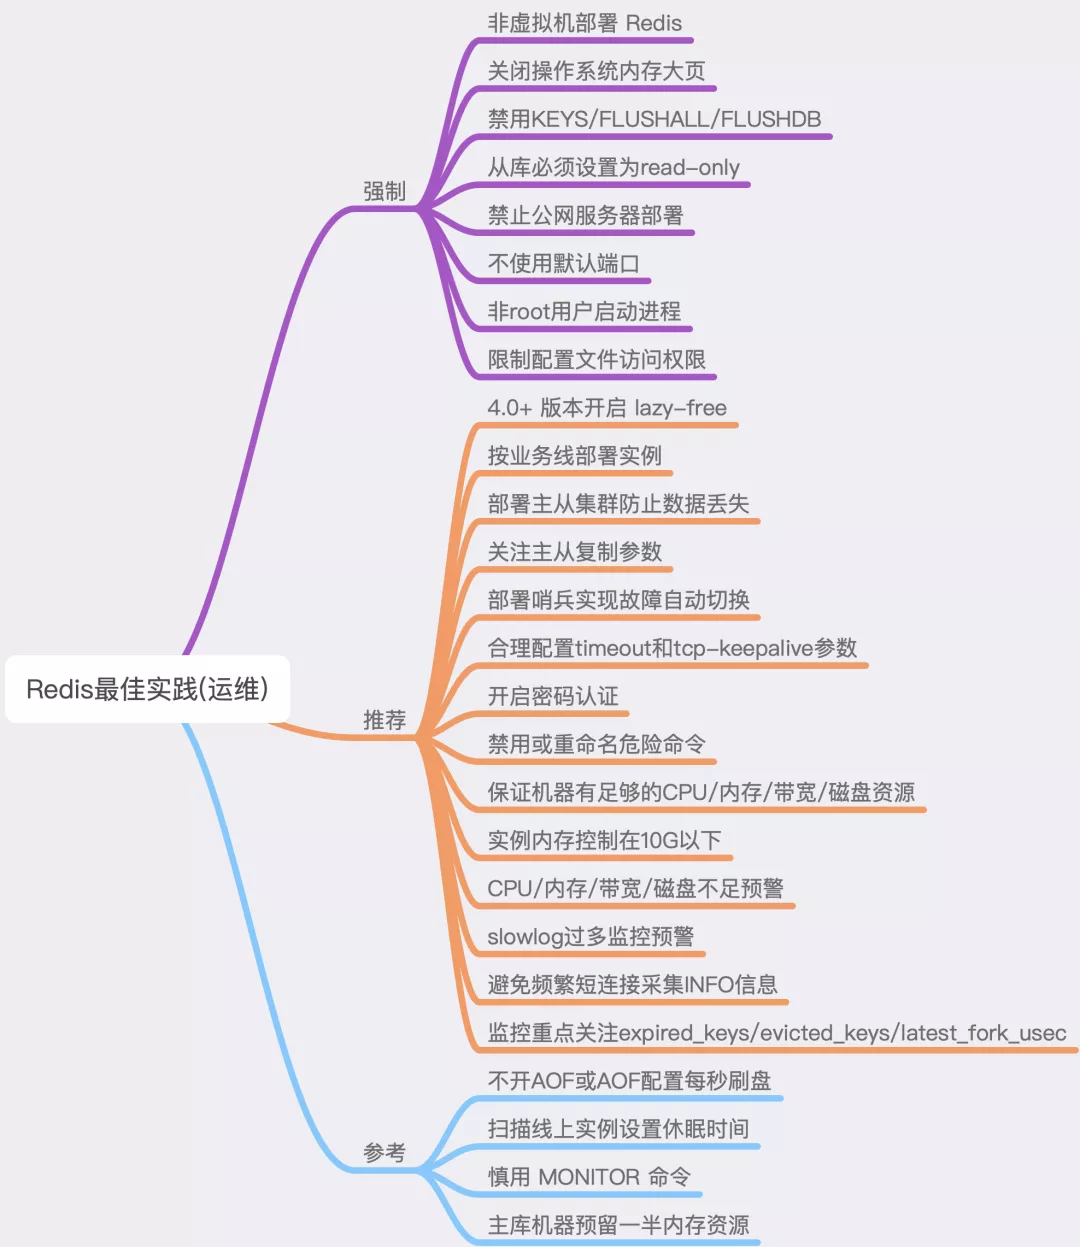
Best Practice
Reference
https://mp.weixin.qq.com/s/Fz1EbsmJP5k2Rh6ir_a1pQ